Lens AF microadjustment - the why and the how
Why?
If you take your photography seriously and often work with telephoto lenses at wide apertures then read on.
When shooting wildlife one is often working with very limited depth of field (DOF). For example, with a full-frame camera (1Ds), a 500mm lens at aperture f/4 with a focal distance of 10m will give you just 9cm DOF, meaning that accurate focusing is paramount. [Note: With crop-sensor cameras (with APS-H and APS-C sensors) DOF will be even less!]
Many of us make significant investment into quality prime lenses and digital SLRs but are we getting the best focusing performance from them? Despite stringent quality control in the manufacture of such equipment there will be differences in tolerances in the lens mounts and positioning of key glass elements and sensors. To ensure that you are getting the best performance from your camera/lens combination(s) you should calibrate them via 'lens AF microadjustment'. There are many ways to do this but outlined below is my simple method which I find works well. Please note that it is specifically written for Canon equipment although other manufacturers (Nikon, Sony, Pentax) also have this feature built into their high-end cameras.
Please note: Other methods are available which may be more appropriate for shorter focal length lenses. There is an excellent article on Northlight Images covering these methods.
Please note: Other methods are available which may be more appropriate for shorter focal length lenses. There is an excellent article on Northlight Images covering these methods.
If you are unsure if your camera supports AF microadjustment please refer to the documentation. Recent models such as 1DIII, 1DsIII, 50D, 7D, 5D Mk II and IDMk IV all have this option.
How
What you need
As well as your camera and lens, you need:
- A sturdy tripod, plus an additional form of support, which could be another tripod, the back of a chair or something similar
- An opaque 30cm/12" ruler
- An angle bracket or similar means of supporting the ruler
- An extra weight to hold the lens down - I use a pair of binoculars
Setting things up
I made a simple bracket from wood to support the ruler at a 45 degree angle and screwed it to a trellis post in the garden (excuse my fat balls!).
 |
| Side view of ruler on support |
 |
| Front view of ruler on support |
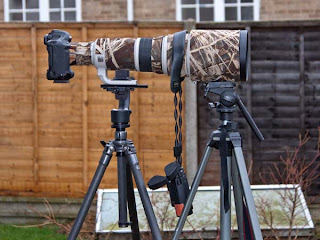 |
| Equipment mounted on two tripods with binoculars to keep it all steady (second tripod is supporting the lens hood) |
The next part is the fiddly bit....
- You should set up your camera at a distance from the ruler that you typically shoot your subjects at - say 10-30m. Make sure it is roughly the same height and perpendicular too. I put a red dot with a felt-tip pen in the centre of the ruler to make setting up easier
- Next, adjust the tripod supports so that the central focus point is exactly on that red mark on the ruler
Equipment settings
- If your lens has image stabilisation, turn it off
- Auto focus should be turned on
- The central focus point (only) should be enabled
- Set your camera to aperture priority and select the largest aperture (lowest f/number). You should try and get a shutter speed of at least a few hundredth of a second (if necessary, wind up the ISO).
- Set the focusing mode to 'One Shot' (not servo)
- If you have a cable release you should use it in combination with mirror lock-up. However I find that just using the timer delayed release (2 seconds) works just fine
- Take a set of three images, ensuring that before each one you manually adjust the focus ring on the lens to defocus the ruler
- Review the images on the LCD screen on the back of the camera to check that you are getting consistent results (If they are indistinct on the LCD, load them onto your computer to view in more detail). If they are variable check that stability of the equipment
You are looking to see which part of the ruler is in the sharpest focus and, once this is ascertained, you can use the microadjustments.
 |
| In this example, the lens is 'front-focusing' i.e. the sharpest part of the image is at the bottom of the ruler, which is closest to the camera. This example was taken using a 1.4x converter with my EF500 and 1D without any adjustment. As you can see the focal point (where the red dot is) is very blurred. |
Making the adjustments
The lens microadjustment is located in the 'Custom Functions' section of your Canon camera's menu system. On a 1D MkIV and 50D it is C.FnIII 7 - refer to your instruction manual for full details.
 |
| Once you are inside the AF Microadjustment menu, use the quick control dial to adjust the settings as required. |
If your lens is front-focusing you will need to adjust to the right, i.e. +ve adjustment. To correct for back-focusing you will need to adjust to the left, -ve adjustment.
When setting the adjustment you will need to bear in mind the types of subjects that you commonly shoot. If you photograph butterflies you may want to err on having virtually all the DOF in front of the focal point (you can focus on the head of your subject and keep the wings as sharp as possible). For bird photography you may want to maintain the DOF more behind than in front.
One of the great things about these adjustment settings is that it is possible to save settings for all your lens/converter combinations. Once this is done you can just shoot away!
Without any calibration my 1D/EF500/1.4x combination was front focusing badly, which would have resulted in very disappointing results. I had to adjust to +15 to bring it to where I wanted. Interestingly, without the 1.4x converter no adjustment was required.
I hope you found this article useful and if you have any questions please do not hesitate to contact me.
That's interesting as I found the same thing when using the 1.4x converter on the 70-200mm is II - by itself the lens was dead on but with the teleconverter front focuses a little.
ReplyDelete